

If you’ve never dealt with a shattered or cracked rear window before, the whole process can feel like a black box. You drop your car off, or a technician shows up at your driveway, and an hour or two later your rear glass is back to normal. But how is a rear window replaced, exactly? What is involved in rear window replacement from the moment you book to the moment you drive away? This rear window replacement guide walks through the process step by step, so you know what to expect during rear window replacement before your appointment even starts.
Why Rear Window Replacement Works Differently Than Windshield Repair
Before getting into the steps, it’s worth understanding one key distinction. Front windshields are made of laminated glass, which is why small chips can often be repaired with resin injection. Rear windows, on the other hand, are almost always made of tempered glass, designed to shatter into small, rounded pieces for safety rather than crack the way laminated glass does. Once tempered glass is damaged, resin repair isn’t an option, so rear window replacement is the standard solution rather than a repair. So how does rear window replacement work, and how is it different step by step from a windshield repair? If you’re weighing repair against replacement more broadly, our windshield repair vs replacement guide covers that distinction for front glass specifically.
Before the Appointment: What to Expect When You Book
The rear window replacement process actually starts before a technician ever touches your vehicle. When you call to book, a good provider will ask for your vehicle’s year, make, and model to confirm the correct replacement glass is sourced, including any embedded features like a defroster grid, antenna connection, or rear wiper mount. If you’re planning to use insurance, this is also when coverage gets verified. Our insurance claims process page explains how ICBC comprehensive coverage typically applies to rear glass claims, often reducing your out-of-pocket cost significantly.
Getting this step right matters. Ordering the wrong glass, or missing that your vehicle has a specific feature built into the rear window, is one of the most common causes of appointment delays.
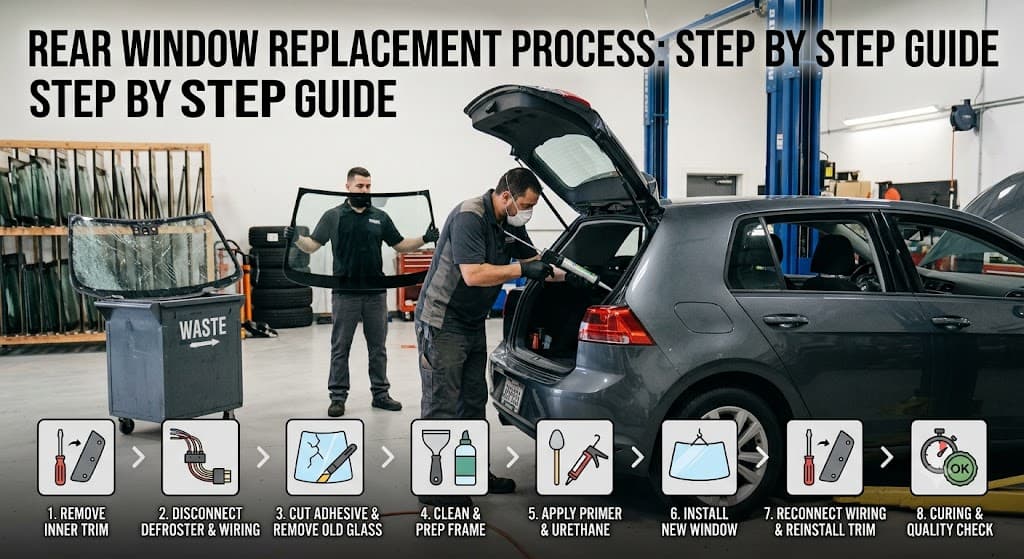
The Rear Window Replacement Process, Step by Step
So how do technicians replace a rear window in practice? Here’s what the full rear window installation process actually involves once your vehicle is in the technician’s hands, whether that’s at a shop or through mobile service at your home or workplace.
Step 1: Damage Inspection and Vehicle Protection
The technician starts by inspecting the extent of the damage, confirming the glass type, and checking for any complications like frame damage or rust around the mounting area. Before any glass comes out, the vehicle’s interior is protected with covers to prevent shattered glass fragments from getting into the seats, trunk lining, or ventilation system. This preparation step is easy to overlook from the outside, but it’s what separates a clean job from one that leaves glass fragments turning up in your car for weeks afterward.
Step 2: Trim and Component Removal
Next, any trim, molding, or components surrounding the rear window are carefully removed. This often includes the rear wiper motor and arm if your vehicle has one, along with any third-brake-light housing that’s mounted to or near the glass. This step requires care, since clips and moldings on modern vehicles are often specific to that trim piece and can be damaged if removed too quickly.
Step 3: Safe Glass Removal
With the surrounding components clear, the damaged glass itself is removed. Technicians use a cold knife, wire-out tool, or similar specialized equipment to cut through the old urethane adhesive holding the glass in place. Because rear windows frequently include defroster wiring embedded directly in the glass, along with antenna connections in some vehicles, this step is done carefully to avoid damaging the surrounding wiring harness that these components connect to. All broken glass, including fragments that may have fallen into the trunk or interior, is thoroughly cleared out before moving forward.
Step 4: Frame Preparation
Once the old glass and any remaining adhesive residue are cleared from the mounting area, known as the pinch weld, the frame is cleaned and inspected. Any leftover urethane is trimmed down to an even, thin layer rather than removed completely, since a small amount of properly prepped old adhesive actually helps the new bond adhere. This is also when a technician checks for rust or corrosion, which needs to be addressed before installation to prevent future leaks.
Step 5: Adhesive Application and Glass Installation
How is rear window glass installed once the frame is ready? A bead of automotive-grade urethane adhesive is applied evenly around the frame. This is the same class of adhesive used in windshield installation, chosen specifically for its strength and weather resistance. The new rear window, sourced to match your vehicle’s exact specifications, is then carefully positioned and set into place. Precise alignment matters here, not just for appearance, but for a proper seal that prevents water leaks and wind noise, and for ensuring any embedded defroster grid lines up correctly with its electrical connection points.
Step 6: Component Reconnection and Testing
With the new glass set, any defroster wiring, antenna connections, or rear wiper components that were disconnected during removal are reattached. This is a step some less experienced installers rush through, but it’s critical: a rear window that looks fine but has a disconnected or improperly reconnected defroster line means you’ll be back at the shop the first cold morning you need it. A thorough technician tests these connections before considering the job complete.
Step 7: Final Inspection and Cleanup
The last step covers everything that makes the difference between an acceptable job and a genuinely well-done one. The seal is checked for consistency around the entire perimeter, the glass alignment is verified, and any remaining glass fragments are cleaned from the trunk, interior, and door jambs. Only after this final check is the vehicle considered ready to hand back.
How Long Does the Rear Window Replacement Process Take?
Wondering how long does it take to replace a rear windshield from start to finish? For most vehicles, the full rear window replacement process takes about one to two hours, including all seven steps above. Vehicles with more complex features, like an antenna integrated into the glass or a less common wiper mounting system, can take slightly longer. If a specific replacement glass needs to be special-ordered for a less common vehicle, that adds to the overall timeline before the appointment can even begin, separate from the actual installation time.
Does Rear Window Replacement Need Cure Time Before You Can Drive?
This is one of the most common questions, and the answer differs slightly from front windshield replacement. Because rear windows use tempered glass and don’t play the same structural role in supporting the vehicle’s roof or airbag deployment that front windshields do, most rear window installations don’t require the same lengthy safe drive-away time. That said, the urethane adhesive still needs some time to begin setting properly, so a good technician will let you know exactly how long to wait based on the specific adhesive used and the weather conditions that day, since cold or humid conditions can affect cure time.
Why Attempting This Yourself Is Riskier Than It Looks
A quick search turns up plenty of DIY guides for replacing a rear window yourself, and while it’s technically possible with the right tools, it’s a significantly harder job than it looks from a video. Tempered glass shatters into hundreds of small, sharp fragments that need to be thoroughly cleaned from the cabin, trunk lining, and ventilation system. Cutting out old urethane without damaging the pinch weld takes practice, and reconnecting defroster wiring incorrectly is a common DIY mistake that isn’t obvious until the first time you need the defroster and it doesn’t work. We’ve covered similar tradeoffs for front glass in our DIY windshield repair kits vs professional repair guide, and the same logic applies here: a rushed or incomplete rear window installation often costs more to fix properly than booking a professional appointment in the first place.
Why the Process Matters for Your ICBC Claim and Warranty
If you’re filing an ICBC claim for rear window replacement, the quality of the installation process directly affects whether your claim and any warranty coverage hold up. A properly documented replacement, using the correct adhesive and glass matched to your vehicle’s specifications, is what an ICBC-approved shop provides as standard. Skipping steps, using improper adhesive, or failing to test reconnected components can void a workmanship warranty and, in some cases, create issues if a related problem comes up later. This is one of the clearest reasons to choose a certified provider over the cheapest option available.
What to Expect After Your Rear Window Replacement
Once the process is complete, most vehicles are ready to drive right away or after a short wait specified by your technician. It’s worth avoiding automatic car washes for the first few days to give the adhesive additional time to fully cure, and keeping an eye on the defroster function the first time you use it in cold weather. If you notice any wind noise, water leaking during rain, or a defroster that isn’t working, contact your provider promptly. A properly completed installation shouldn’t have any of these issues, and a shop backing their work with a workmanship warranty will address them at no additional cost.
Frequently Asked Questions
How long does rear window replacement take?
Most rear window replacements take one to two hours, including inspection, removal, installation, and final testing.
Can I drive right after rear window replacement?
In many cases, yes, though your technician will confirm based on the adhesive used and weather conditions that day. Rear windows generally don’t require the longer cure times front windshields do.
What happens during rear window replacement if my vehicle has a defroster?
The defroster wiring is carefully disconnected during glass removal, then reconnected and tested once the new glass is installed, before the job is considered complete.
Is rear window replacement more complicated than side window replacement?
It can be, particularly on vehicles with embedded antennas, rear wipers, or defroster grids, all of which add extra steps compared to a standard side window swap.
Do I need an appointment, or can rear window replacement be done same day?
Same-day service is often possible if the correct replacement glass is in stock for your vehicle. Booking early in the day gives you the best chance of same-day completion.
Book Your Rear Window Replacement in Surrey Today
Now that you know rear window replacement step by step and exactly what happens during the process, and how these rear window replacement steps compare to a typical car window replacement process or broader auto glass replacement process, you can book with confidence. Expert Auto Glass provides certified rear window replacement across Surrey, with mobile service, ICBC claims support, and a workmanship warranty on every installation. If you’re not yet sure whether your damage needs replacement, our guide on signs your rear window needs immediate replacement can help you decide. For a full pricing breakdown, see our rear window replacement cost guide. Call (604) 265-5308 or book online for your free quote today.